Customization Options by CRM Version
Because Microsoft
Dynamics CRM comes in three different versions (On Premise, Partner
Hosted, and Microsoft Hosted [CRM Online]), some limitations apply to
what you can do within each version when considering customization.
Table 1 shows customization options by CRM version.
Table 1. Microsoft Dynamics CRM Customization Options
| | Microsoft Dynamics CRM Version |
|---|
| | On Premise | Partner Hosted | Microsoft CRM Online |
|---|
| Entity customization | X | X | X |
| Attribute customization | X | X | X |
| Form/view customization | X | X | X |
| Relationship customization | X | X | X |
| Workflow customization | X | X | X |
| BU, teams, and role configuration | X | X | X |
| Administration configuration | X | X | X |
| Business management configuration | X | X | X |
| Product catalog configuration | X | X | X |
| Relationship roles configuration | X | X | X |
| JScript events on forms and fields | X | X | X |
| Navigation options | X | X | X |
| User interface customizations | X | X | X |
| IFrame | X | X | X |
| Create new reports (Report Wizard) | X | X | X |
| Upload custom reports | X | Varies | – |
| Programmatically upload reports | X | X | – |
| Access to filtered views | X | X | – |
| Import/export and publish customizations | X | X | X |
| Import/export and publish workflow | X | X | X |
| Data import/migration | X | X | X |
| Plug-in usage | X | Varies | – |
| Workflow creation | X | X | X |
| Workflow creation using .NET assemblies | X | Varies | – |
| Access to Discovery web service | X | X | X |
| Access to CRMService web service | X | X | X |
| Access to MetaData web service | X | X | X |
| Access to Deployment web service | X | X | – |
| Active Directory (AD) authentication | X | – | – |
| Forms-based authentication | X | X | – |
| Windows Live authentication | – | – | X |
Customizing Navigation
Microsoft
Dynamics CRM enables you to easily perform navigation customizations by
editing the site map. The site map is an XML file that is read and
parsed by Microsoft Dynamics CRM when it is first loaded and can be used
to change what and how information displays in the navigation pane.
Figure 1 shows a configuration that was made to the Resource Center that renames it from Resource Center to Help Area.
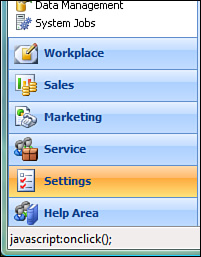
The site map consists of three primary elements:
The Area element,
which is used for the primary areas on the navigation pane (Workplace,
Sales, Marketing, Service, Settings, and Resource Center).
The
Group element, which divides the Area elements into subareas. The
workplace area has six default groups: My Work, Customers, Sales,
Marketing, Service, and Scheduling. These are optionally shown, however,
because users select which ones they will see.
The
SubArea element, which has the actual content links. All the links in
the default site map point to the CRM application, with the exception
being the Resource Center. In addition, the SubArea element can link to
either CRM items or point to any hyperlink.
Note
A
common use of the SubArea Resource Center element is to point to your
organization’s intranet site, instead of the Microsoft Internet site,
for CRM resources.
You also have the option
to edit the localized titles using the locale ID (LCID), to add
descriptions to the primary elements, and to set the privilege level to
view the subarea.
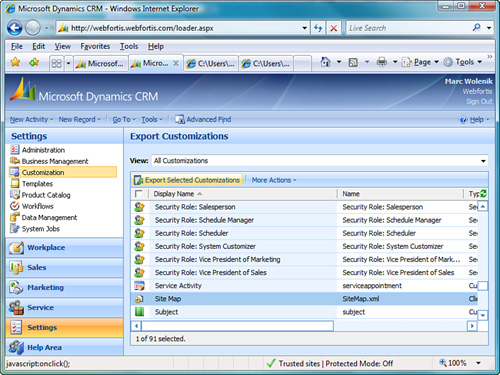
To edit the site map, it must be first exported, then modified, and then reimported.
To export the site map, navigate to Settings, Customizations, and then select Export Customizations. Locate the site map (see Figure 2) and select Export Selected Customizations. Save the resulting customizations.zip file to your desktop.
When you are editing the
site map, we highly recommend an environment that performs schema
validation. Although Microsoft Dynamics CRM will perform validation on
the schema during the upload, the editing environment will prevent you
having to rework any applied edits.
A free application that supports schema validation is XML Notepad 2007, which you can download from http://www.microsoft.com/downloads/details.aspx?familyid=72d6aa49-787d-4118-ba5f-4f30fe913628&displaylang=en. In addition, you can use the Microsoft demonstration tool available from http://www.microsoft.com/downloads/details.aspx?FamilyID=634508DC-1762-40D6-B745-B3BDE05D7012&displaylang=en.
This application has a built-in site map editor that enables you to
modify the site map without having to work with it by hand.
In the preceding example in which we changed the Resource Center to Help Area, we’re using the Title element as follows:
Navigate to the Area element for ResourceCenter, and edit it from this
<Area Id="ResourceCenter" ResourceId="Area_ResourceCenter"
Icon="/_imgs/resourcecenter_24x24.gif" DescriptionResourceId="ResourceCenter_Area_Description">
To this
<Area Id="ResourceCenter" ResourceId="Area_ResourceCenter"
Icon="/_imgs/resourcecenter_24x24.gif" Title="Help Area" DescriptionResourceId="ResourceCenter_Area_Description">
A number of other options can be performed when working with the site map:
In addition, you can apply
security roles to areas of the site map to create an “adaptive UI” and
show only the areas and links that users have permission to view.
Note
Changes to the site map are global in nature.
Before making any
modifications to the site map, be sure to make a backup copy of the XML
output in case you need to restore your changes.